Installation Guide
ScreedBoard 28 is a composite overlay acoustic treatment board, combining a high-density gypsum fibre board with a unique resilient fleece. It has unrivalled acoustic performance and benefits from an engineered interlocking edge profile. Suitable for both, steel and timber joisted floors and concrete floors.
Contents:

Products and Tools
To complete the installation, you will need the following items.

Required products for system
Cellecta - ScreedBoard 28
Cellecta - Pro Adhesive
Cellecta - YELOfon FS (Flanking strip)
Cellecta – TSS (Threshold Support Strip)
Cellecta - MP60 Surface Primer
Cellecta – ScreedBoard fixing kit
Required tools for installation
Club hammer
Shims
Tape measure
Pencil
Hand saw & power circular saw (PCD blade)
M-class extraction system
PPF2 face mask
Ear defenders
PPE as site requirements
Pre-Installation
Moisture Damage
Whilst ScreedBoard 28 is a dimensionally stable product even when wet, any wet boards should be left to dry out completely on a level surface and be assessed for suitability before being installed.
Should the boards become saturated during storage or in-situ, we strongly advise contacting our technical department to arrange a site survey to review the products suitability.
Attention should be paid to all health & safety regulations. For Safety Data Sheets please contact the technical department.
Pre-Installation
Before commencing installation, take time to familiarise yourself with the products and these instructions.
Prior to installation, ScreedBoard 28 should be left to acclimatise for 24 hours in the installation space, remove all the temporary packaging for this process.


Sub-Floor Preparation
Sub-Floor Preparation
Prior to installing the ScreedBoard 28, ensure that the substrate is level and structurally sound. The floor should have a surface regularity of SR2. For timber or steel joisted floors the structural sub-floor must be secured to the joists with suitable fixings.
Clean the floors of any building debris to allow the boards to lay flat. Fill all gaps and potential air paths in the floor deck with a suitable flexible caulking mastic.
Moisture Content
The current guidance states 75% relative humidity as an acceptable upper limit for slabs and screeds to accept a floor covering, measured using the surface humidity box method.
If this level is not reached a DPM should be installed on the slab before the ScreedBoard. Please seek the advice of a specialist if deemed necessary.
New guidance states 85% as the upper limit and demonstrates that readings taken using the in-situ method should be approx. 10% higher than readings taken with surface humidity box method.
SOURCE: Contract Flooring Association
Levelling subfloors
Concrete floors can be levelled to bring them within the SR2 floor surface tolerance, this equates to a maximum 5mm gap over a two-metre straight edge.
Use a suitable levelling compound and follow the manufacturers installation instructions and allow to fully dry before installing the ScreedBoard. There are a multitude of manufacturers and specialist levellers for differing applications depending on the substrate types


Installation of ScreedBoard 28
Install left to right
First measure the room and ensure that no cut board will have any dimension less than 200mm.
Starting in the far-left hand corner of the room, place the first ScreedBoard with the tongues of the short and long edge facing the walls. Paying attention to the direction of installation as indicated on the board surface. There is no need to remove the tongues.
Pack the board away from wall
With shims allow for an 8-10mm gap around the perimeter. These shims should be placed at regular intervals between the wall and the board.
TOP TIP - The shims keep the ScreedBoard in place whilst maintaining the perimeter gap. Don’t use the YELOfon FS/ES in place of packers as this is a compressible material.
Gluing and interlocking joints
Run a 5mm bead of PRO Adhesive along the groove of the ScreedBoard and interlock the next board.
Ensure the joints are flush and there are no gaps.


Cutting the ScreedBoard
At wall abutments, measure the gap from the already laid ScreedBoard to the wall, allowing for the 8-10mm gap between the board and wall. Mark the board to be cut, taking care to measure the board, not including the tongue.
Complete the first row
Cut the ScreedBoard to the required length. Apply the PRO Adhesive to the groove and insert to complete the first row. Install the packers to maintain the perimeter expansion gap.


TOP Tip - ScreedBoard can be cut with a hand saw, however this can be laborious. Therefore, a powered circular saw is a more efficient method. Whilst a standard circular saw blade is acceptable, a (PCD) Polycrystalline diamond tipped blade can offer greater longevity.

Health & Safety
Ear defenders and all required PPE should be used when cutting ScreedBoard. Please consult with Cellecta’s Safety Data Sheet, a copy of which can be supplied upon request
When using a circular power saw use extraction equipment that meets at least the dust class M (medium hazard) classification for cleaning.
A moulded face mask with a minimum assigned protection factor of 10 (FFP2) will be required for most machining operations and for short duration dusty tasks such as emptying LEV dust collectors. If RPE is required for high work rate activities or extended wear times, then powered RPE may be more suitable.
Above Health & Safety advise from Health and Safety Executive (HSE): (CIS69) Controlling construction dust with on-tool extraction.
More information available at www.hse-gov.uk
Continue installing ScreedBoard 20
For any off-cut to be utilised to begin a row, it must be a minimum of 200mm.
Also check that using the off-cut from the previous row will not leave a board less than 200mm at the end of the run. If it does, as in the example shown, trim the left-hand edge from the ScreedBoard. See image 008
Planning the layout in advance can help reduce waste.
Run the PRO Adhesive along the groove of the previous row and install the next row.
Using ScreedBoard Fixing Kit

ScreedBoard has a unique engineered interlocking edge profile and therefore it is necessary to utilise the ScreedBoard Tool Kit. This comprises of a pull bar, and a fixing batten which is profiled to engage the ScreedBoard edge detail without damage.
Top tip – The Screedboard tongue & groove joints must always be clear of debris to ensure they interlock with no gaps. A 2” paint brush is ideal to clean the joints.
See image 009 (Pull bar used as a lever)
See image 010 (Pull bar in use)
See Image 011 (Profiled batten in use)


Using ScreedBoard Fixing Kit
Apply the Adhesive to both the exposed grooves and tilt the next board to locate the tongue into the long groove of the first row. Leave a small gap between the previous board.
Place the lip of the green fixing batten into the groove of the ScreedBoard you are installing and using a club hammer ensure the boards are fully interlocked.
Repeat this process across the floor.
Remember to install shims to maintain the perimeter gap.
Ensure the tongue & grooves are clear of any debris.


Brick-bond installation
Install the remainder of the Screedboard28 in a brick bond formation,
ScreedBoard 28 can be installed through doorways into other rooms or hallways.
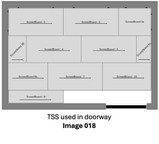
Door thresholds

If required a butt joint can be installed in a doorway. Cellecta’s rubber Threshold Support Strip (TSS) is used to support the joint between the two areas.
Cut the TSS to fit the doorway, 10mm short of either end. Cut away the corresponding fleece from the underside of the ScreedBoard 28.
Then apply two beads of Pro Adhesive to the square edge of the ScreedBoard that’s been cut to fit into the doorway. And butt the corresponding ScreedBoard together, the doorway must not be trafficked for 24 hours to allow the adhesive to bond.


Floor treatment isolation - Flanking strip

It is important that none of the boards are in contact with any walls or door treatments as this can result in acoustic failure.
Remove the packing shims from around the floor and install YELOfon FS30 flanking strip to isolate the floor treatment and stop flanking transmission.
Any soil pipes or services that penetrate the ScreedBoard should be isolated using the FS30.
All plasterboard, as well as the skirting boards must be isolated from the ScreedBoard by the flanking strip.
Once the ScreedBoard 28 installation is complete, the skirting board can be installed over the FS30, with any excess trimmed back using a knife.


Movement Joins
If the ScreedBoard floor dimensions exceed 20meters a movement join will be required.
Intermediate movement joints (min. 10mm) should be incorporated for floors more than 20m long.
The intermediate movement joint needs filling with a suitable sealant. The best place for a movement joint is below an entrance door threshold.
Installation detailing
Door threshold / Movement joint
Wall treatment install before floor treatment.
Wall treatment installed after the floor treatment.
Timber stub partition built off the structural substrate.
Non-load bearing timber stud partition built off the floor treatment.
Non-load bearing metal frame partition built off the floor treatment.
WC pan install off the Screedboard 28
Bath & shower trays built off Structural floor.


Fixing into ScreedBoard

ScreedBoard 20 is a floating floor treatment and therefore must not be mechanically fixed to the structural floor.
Any mechanical fixings penetrating the floor treatment may result in acoustic failure and could puncture the UFH pipework. Ensure all fixing into the ScreedBoard surface penetrates no more than 18mm.
ScreedBoard can be screwed with a drywall screw or a multi purpose screw.
ScreedBoard can also be drilled to except a plug and screw fixing.
When mechanically fixing product thicker than 20mm such as a timber sole plate, it’s advised to drill a service hole to reduce the screw length, and to glue the product to the ScreedBoard for an extra secure bond with Pro Adhesive.

Before installing floor finish
Allow the Pro Adhesive to fully cure for a minimum of 24 hours prior to trafficking the floor or installing floor finishes.
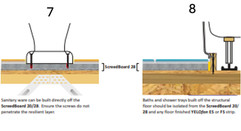
Sanitary wear & Kitchen units
It is recommended that sanitary ware and kitchen units are built off the structural floor with the floor treatment isolated by 8-10mm from the legs or units.
Install any decorative panels such as plinths or bath surrounds to produce a neat finish. Seal any gaps with a flexible mastic.
If required raise the height of the sanitary wear or units to suit the finished height of the acoustic flooring including the selected floor finish.


Floor Finishes
All floor finishes should be installed in line with the installers and manufacturer’s official guidance and the relevant British Standards. For further information on floor finishes and floor treatment preparation, please contact Cellecta technical department or download a copy of our comprehensive Floor Finishing Guide from our website.
Vinyl Finishes
When installing floor finishes such as LVT and vinyl any gaps in the ScreedBoard must be filled, and a feather coat applied to ensure no grinning occurs through the vinyl. If the vinyl is to be adhered to the ScreedBoard always prime the surface with MP60 primer.
Tiled Finishes
When tiling to ScreedBoard 28, the upper surface must be primed and sealed. A decoupling layer should be considered where natural stone tiles are being installed due to the inherent movement in this type of tile. In most other cases a de-coupling layer is not required due to the stability of the ScreedBoard 28, however, please check this guidance does not conflict with any installer warranty.
Best Practice
Cellecta is constantly reviewing all its guidance and best practices and therefore reserve the right to alter specifications and guidance at any time and without notice. The information contained in this document is based on Cellecta’s experience and represents best practices at the time of writing, this document does not act as a Guarantee of the product or its performance.
Any third-party advice shown should be checked with the relevant party, to ensure that it is current and meets best practice, industry standards and legislative requirements. Cellecta accept no responsibility for this third-party advice.
Specifications
Brand Name
Screedboard® 28
Product description
High density composite acoustic overlay floorboard
Thickness
28mm
Facing Board
20mm ScreedBoard 20 (interlocking, HD gypsum)
Resilient layer
8mm FIBREfon 8 acoustic fleece
Edge profile
Interlocking tongue & groove
Board dimensions
600mm x 1200mm
Weight
26kg/m² - 18.72kg/board
Flanking/edge strips
YELOfon FS15, 30, 50
Downloads
Robust Detail and Proprietary applications
Third Party Accreditation and Approvals